
Peanut Butter Spread

Peanut butter spread is not referring to my hips from eating too much of it, that's a transistor radio pooching out the scotty dog pajama waist band.
No, I'm talking about the burnt umber tempera used as pigment to tint the joint compound smothered on the famous cottage walls. It looked and felt like a certain lunchbox staple tonight but after I trowel on other darker tints and the texture them with layers of acrylic washes, I think the walls will look like I'd like.
Stick-y. Boo.
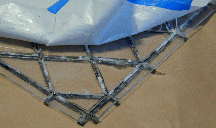
The window leading glue technique didn't work. Gluing down the flexible licorice whip strips made out of polymer and paint glued onto the window front ok, a little more time consuming as glue had to be placed in between the panes as well as adhere the leading, but even after leaving it overnight the glue didn't dry where it was covered. The sticky paper was used to hold the tiles in place. To worsen the result, the sticky paper's adhesive was too strong and just about pulled the tiles off the leading as it was pulled away. But nevermind, I have a plan.
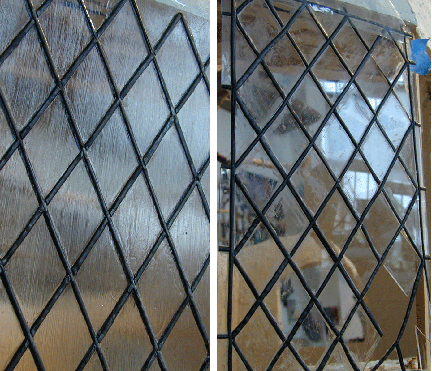
side by side, pretty much in same position to light source, I can see the flat sample, while passable, does in fact lack the change in angles. the new indie pane reflections are rocking the Tudor.
It didn't really matter how the test panel glued up exactly. I just needed enough of it to give a hint as to whether the individual panes would look any different than the previously made flat sample panel. And boy, did it! I couldn't tell by looking by eye after I freed the panel from the sticky paper trap, such as it was. But when I looked at it through the camera, it sure did the sparkle trick I have been coveting.
My new idea is to cut strips of cardboard to scale, paint them with my faux metal medium of choice, and hot glue these onto arranged tiles (maybe positioned with mini spacers) on weakened sticky paper. I figure that now that the panes are flexible the leading needs to be rigid. I could buy square or flat model building wood for this but if the cardboard looks right I won't need to.
I think the completed cottage is going to be really great looking. And I am so anxious to get to the dressing and finishing that I'm plowing through these stages just to be able to get those parts!
Grateful for the energy to work, best to you!
Looks like adobe sort of, it's great that you are tinting the goo instead of just painting it. I think that will probably be a much more realistic aged finish when done.
ReplyDeleteI see what you mean with the windows. There is no comparison between the flat piece and the individual pieces. It looks way good! (technical difficulties aside)
Wow, the cottage walls are getting there, how wonderful. and now for my favorite part in wall making... texturing and aging, fun.
ReplyDeleteAbout the windows, I love your ongoing romance with that window. no doubt, the "indie panes" dose the reflection trick and I hope the cardboard solution you came up with, will work. although, I must admit, I'm a bit skeptic about it, hope I'm wrong. I think you should try to combine the “indie panes” with one of your previous experiments... arranging the “indie panes” with the desired gap between them, on a flexible plastic or wax paper (use a bit of rubber-cement glue in the middle of each “indie” to secure them in place). fill the gaps with your custom made formula of Liquid lead, making sure it covers a bit of the "indies" edges, let it dry (hopefully joining all the “indies” while it dries - since I don't know how thick and heavy are the diamond segments and how flexible is your liquid lead, I can't promise it will work), then remove gently from the wax paper and peel off the bits of the rubber-cement glue.
about the Q you asked me on your last comment at the "If You Had Known" post:
for some unknown reason, the walls, that you would think you'll finish in no time, takes forever, floors are even more time consuming!!! I love panels on my little walls (as you can see) and they are a lot of work, a lot!
Before applying the color/texture on the walls, I try out the different possible finishes for the Walls, floors and panels on a 15 cm cardboard or balsa squares, which I later use as coasters which led me to some interesting findings:
Lemonade - for a wood floor that needs to be polished a.s.a.p
Coffee - great for really bad dampness on wallpaper
Tea -the best age stains, but i think that's common knowledge
Red grapefruit juice - really pretty sun fade on wallpaper
7-up and Cola - corrupts wood stains and glaze
Milk - just stinks
All in all, everything takes more time then you thought it would, lots of things pop up on the way. It’s like an adventure game with lots of side quests, and that’s the way I like it, don’t you?
"Milk - just stinks" :D
ReplyDeleteThanks for that list Hila! Fantastic stuff, will surely come in handy, I'm espcially excited about juicing wallpaper :)
Shell, wow, looking great! Y'know, until you posted the pic of you standing inside the cottage, I had no idea it was going to be that large! WOW! This is going to be incredible....
Also, dont know if you'd be interested in trying new leading material, but I was in a craft store the other day and by the glass paint they had a whole range of liquid leading for stained glass windows, may be worth trying out...
Thanks Mark! Now that's it's dry it really does dance on the adobe tip.
ReplyDeleteHila-Eugenie-Rosenberg-Arazi, thank you for these answers! When you say it like that I am uplifted and glad that it has such side quests. And you don't even know what a relief it is to hear that walls and floors, etc. take way more time than it seems they should. I was so confused about that! And I'm glad you keep hydrated too!
I love your pipe in place (squeeze in situ?) idea for the windows. And at first I thought there'd be know way for me to keep the lines uniform enough but then I thought I could try it in place with a straight edge. PLUS Mark wrote to me and mentioned the 1,000 piece laser grid thingy he had included in my package of cut window panes and I realized that the tiny plastic spaces (!) on it are the exact size needed to act as spacers for the clear glass panes! Between these two things, this could be the final solution for terrific tudor.
Jeffery, thanks man, the polymer/paint leading I made it like a custom version of the ones for sale. I use the clear glass paint goo to simulate poured glass distortion. and yep, the scale is larger than most stop motion sets to be sure. It's based on an apple being about he size of a gumball (23cm diameter) and everything was made to fit that.
Thank you all.
Hila, I went back to your site and paid special attention to your walls, Holy Moly. Sister, you are insane! Each wall is a masterpiece. I didn't notice them specifically earlier amongst all the other incredible details. Those panels?!!!!! in Agora and The Pillowman? are you milling those grooved and groovy details? and the petite scroll work? Are you making those or did you carve one and then cast the rest? The framing in My Dream House rooms around the moorish door and the baseboarding, everything--perfect. THANK GOD, Halfland is nearly uncivilized, rustic, and primitive! I won't complain again. (Head bowed low in your honor.)
ReplyDeleteI don't know why I can't get the link to Hila's site going anywhere above, but here it is for those who want to see the mind-splitting teeth-curling details there I'm talking about!
ReplyDeletehttp://www.hilarosenberg.com/index.html
i'm in such awe, shelley. seriously. i don't have the patience for this, but i love to watch others create their own worlds in such exquisite, loving, careful detail. amazing!
ReplyDeleteWow Shelly, that thing IS huge!!! Looks like you could almost sit in it when it's done. Sort of like the girl in Svankmajer's Alice! The texture is looking great.
ReplyDeleteThank you, Gretchin. IF I'm not being all spoiled brat fancy pants about it and throwing my regularly scheduled tantrums over how long things really take to do, then believe it or there's zero patience involved! It's just doing the next thing because one has to, right?
ReplyDeleteMy best friend in junior high used to say I had more discipline than she because I took ballet class hell or highwater every single day. What a laugh, discipline as I think of it never comes into play when I want to do the thing.
And I want this.
Mike, you know what's going to be fun is seeing shots like these when everything is all in beginning stages and then seeing the finished shots. Isn't that always so fun to see the progressive and then the completed thing? It's like knowing the future where everything turns out well. Comforting.
thanks Jeffery, enjoy juicing wallpaper :) and what a talent oozing blog you have?! nice, me like!!!
ReplyDeleteand Shelley, to answer your Q, casting is one of my best friends. I would be lost without it.
Ah-HA! Casting! A secret has slipped out, everyone pounce! Let's quickly scan our projects for places architectural details could be added by casting multiples, raised panels on bars, frames in certain Southern houses, ornamental details. I'm keeping that one in mind. Thanks, Hila!
ReplyDeleteOoooooooooooo, it is starting to unfold!! It will be stunning! I love how yo are showing us the process!!
ReplyDeleteThank you so much, Corey!
ReplyDelete