
100 Days: Fail Bois
 I bought a real birch tree trunk for visual reference at a local floral design supply in the flower district downtown. To tell you the truth, it looked as though it had a quick sloppy sponged white paint job on it. It looked good but so easy to replicate for the many trucks I'd need to finish the set.
As I started to test making a few out of the tons of free fabric core tubes I had here, I soon realized how insanely complex real tree texture really is.
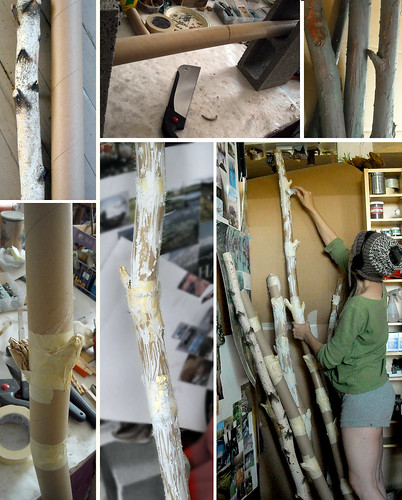
Making the straight tubes (upper left) zig and zag slightly was the easy part. I used a Japanese pull saw to gouge out small 1/2" HA! wedge shaped sections for the tubes set up between two cinder blocks (center top). Then I forced the tube to collapse at the break point and used my favorite material, masking tape, to tightly wrap the joins. I also added rolled up paper clumps to act as quick branch stubs here and there.
I slathered the armatures with my other favorite material, flexible cement, up and down with a small plastic card to obscure the joins and add bark-like texture, not birch bark texture, but a generic tree impression.
Once dry, the painting tests began and what I thought would be too easy ended up being too hard.
 I kept trying to get a decent Faux Bois finish on these tests, going dark light in various browns, taupes, creams, yellow, everything. I simply couldn't get anywhere. Finally, I turned off all the lights at night and took straight white and sponged it on trying to get the values right to my eye in the dark. In the morning the value was better and then it was a simple matter of tinting them over the top with dilute cocoa brown fabric dye mixed with dilute yellow acrylic to stain them for hue. They aren't Birches, but detailed enough to give the feeling of tree trunks to cover the support column on the set.
 Here I've quickly hung a panel of sky-blue plastic tablecloth to start to cover the column. I propped the test trunks in front of that and then placed a piece of sheer silk in front of my camera lens on that side to softly blur. Just trying to get an idea of what needs to be done to finish off the background edges of the set.
Again, I terribly impressed with your ingenuity. I made several hundred 1:12 scale rubber cast trees once for a set made from a carved wood and plasticine covered model that were to replicated 150 ft trees. They took weeks to make, mind you several of them had fishing rod innards so they would swing and some were made to be break-aways. I think I like your method better. They are very convincing.
ReplyDeleteThank you, DJ! I remember the set you made for the broadcast about the volcanic eruption. Is that the one you refer to? That was astounding! Utterly realistic! If you hadn't said you built that forest, I would never have thought it was a model!
ReplyDeletewowee,,,the look so real! I love the tea cups!!!! so kewl!!!
ReplyDeleteThank you, Marcie!! You are outside so much, I take that as the highest praise!
ReplyDeleteBest. Trees. EVAR!!!
ReplyDeleteMikee, are you funning me, son? You can't really think these came out super swell? You're being a good cheerleader, right?
ReplyDeleteI'm having a hard time solving the set edge design. I want it to blur, as if out of focus and at the same time merge into a white paper 2D world, as if halfway Rose Red's puppet show made realistic.
I'll get it. I think I better use those bright green tree tops I painted up as bushy ground cover on the floor between the main set's back drop off and the distant hill set pieces.
I've also made a giant cylinder out of scrap cardboard that can act as extreme foreground trunkage, further selling the thinner ones further away.
I also figured out how to handle the roof construction, I think. Shel sparked the idea off in my head with her looking at the problem.
I'm thinking of making strong wooden corner posts at each wall juncture, that will tie down well. Then use those posts to secure the roof panels in place, even if a wall has been removed. In other words, the roof will no longer be wall dependent for support.
Also thought of how to make the Tudor windows, maybe hopefully out of the plexi pieces, Mark Fullerton lasered for me back in the day!?
If I were to wait until I could arrange to go to a glass studio for a class on proper cutting and soldering, I'd pull all my hair out. Gotta try using what's right here for hair's sake.
There's more. Fire place goodies, double imagery themes, the big Graham Owen post, the butterfly wing tapestry on Rana's loom!
God, I'm chatty!
Yesterday, a for real art dealer came over to look at Upstairs Clare's works ans we was chatting about Halfland. He was fascinated with the specific question of how one brings something like this into reality without knowing how, pioneering our way through it, in a sense.
He suggested I write more about that aspect of the project to document that too.
We're all doing it. Making something really real brings all manner of blocks and rewards with it, eh?
WOOOOWWWW... I simply LOVE how you created these trunks. Those are looking amazing Shelley. You turned off the lights and painted with white.. I will try this!
ReplyDeleteyeah, I couldn't get the value right with the lights on, Yaz. In the dark, I tried to match the real tree and it seemed to help.
ReplyDeleteI was just thinking that almost anyone reading this post could get as many free cardboard tubes for this, as long as they were able to get to a garment district, trimming factory, large fabric store, etc. Even an urban downtown recycling center would likely have as much as anyone could ever need up for grabs.
That is unless where they live has no industry. In which case, you can probably just film in a real forest!