
The College of Collage

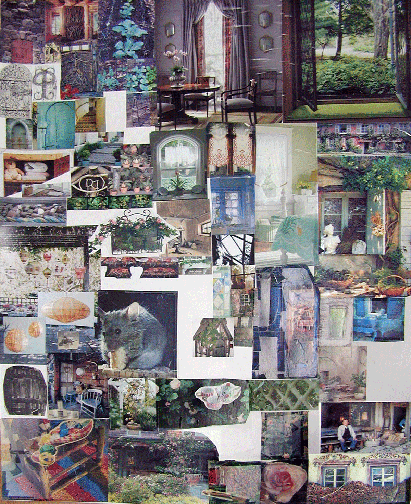
Reference clipping collage for the cottage interior. The bedroom feeling is on the right, hearths in the middle, interior beams ceilings and wood plank floors on left bottom, and texture and lighting detail mixed in.
Today was FANTASTIC! This, this is how I should lead my life as much as possible. I went straight to work on my paid graphic job's surprise revisions first thing this morning. It took me a few hours to complete and I was ready to work on my stuff by late afternoon. Prior to the 1/2 L. Intensive I would have put off my graphics work for days or weeks and/or taken all day and all night to accomplish less.
But the real schoolin' I got today, the thing that proved the most difficult, was how much determination it took me to REPEATEDLY and to OFTEN say "no" to all the 1,000 little "just do" side projects in the workshop. I began with a powerful need to straighten up the confused dusty shop rather than dive into Halfland in the midst of such neglected clutter. I bagged and listed all the little craft project ideas that would have been fast and fun in my mind to have done. That was the thing, I think I may have experienced MY FIRST DAY OF SELF DISCIPLINE!!? I kept consciously choosing to make Halfland my priority all day. I was amazed at how many times the road divided!! For those of you who have always possessed self-discipline, you will think me foolish for just getting a taste of it now. I've had to prioritize in order to get projects done before, just not with such sustained deliberateness. This was very educational to observe.
I had the paste out, doing a quickie scrapbook page that I couldn't set aside with good humor. Not one to waste a loaded brush of glue, I started collaging the cottage interior clippings. After I saw them, I realized it was absolutely the right next step to do as so much of building the cottage involved the beams and window alcoves. I continued to collage other envelopes that seemed likewise key to the cottage, including doors and windows, the porch, wood pile, window boxes, and lanterns, seen just below.
Jeffery inspired me to get started on the Birds in Hats supporting characters. This is their little collage.

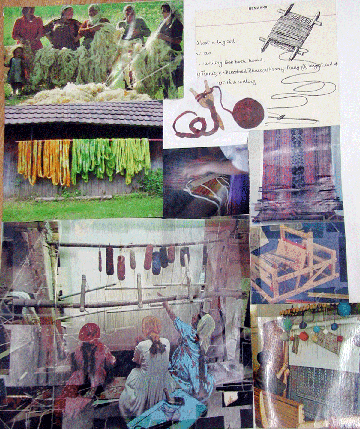
This one shows the types of various wool roving, looms, and weaving structures that Rana character will use on her cottage porch.
I'm going to bed now so I can get up and jump on the cottage and start in in earnest to construct the sucker. I'll go as far as I can with finishing the layout of it, especially since the wood has shown up.
I pulled out the Tarn (crow woman) materials today and plan to condition some ancient modeling clay and get to begin sculpting in her in the afternoon.
Sunday I may want to scoot out with a friend to a home center to collect some blue or pink polystyrene to carve the cottage walls and a bag o' plaster with which to slather them, the walls--not the friend.
We'll see how far I get when the WHOLE day is truly cleared for this work.
Wow. This was music to my ears (eyes). Please re-read the first two paragraphs of this post every day for 30 days. This is definitely a breakthrough moment. Okay, this means full steam ahead on Halfland. Which means your millions of fans from around the world want to see some real action. Like cottages being built, puppets fabricated, and some stop action teasers. Hooray! PK
ReplyDeleteThanks, Sweetheart. I know! I'm so mature I don't recognize m'self.
ReplyDeleteTake good care and please check back often for more real progress.
Love, Shelley
birds in hats! do it, shelley! go!
ReplyDeleteThanks for the fun encouragement, Gretchin!! I'm doing my best to make sure I've got some progress made on Birds in Hats before the end of the Intensive. It might be stand-in birds with a couple hats in a short test animation, but it's my intention to show something on that front during this time. Thanks!
ReplyDeleteOk, round one goes to you, my nemesister! ; )
ReplyDeleteI just got home from work, and got a few nagging things to take care of, but then I roll out the armature assembly line. The race is on~!
ok, I just got that! NemeSis! HA! I love it! I fell asleep on the couch after dinner tonight and didn't report on my day's progress. So you had a chance to get ahead! We'll see... muhhaha.
ReplyDeleteThe feeling is inspiring in the collage, it is a good way to capture the ambience you are going to create, i like the style you are aiming at....
ReplyDeleteThank you, Corey, I love the feel too. It's like my imaginary ideal place. Building is the easy part. The challenge is not to essaploidus from wanting to do everything at once!
ReplyDeleteI fight that 'self dicipline' thing daily too... glad you got a hold of it momentarily... The collages are fabulous! I tend to lay all my favorite images out on a table or ironing table, but they do get kind of mixed up... this is a better solution. How big are your collages? do you reduce images to fit them on? Can't wait to see the birds - they are welcome to come buy their hats at my dollhouse boutique...
ReplyDeleteWell, it's funny you should ask my dear Ulla! I have now worked out THE SUPER METHOD™ for pasting these reference images down. It's now a hard-core pleasure. I used to buy 30" rolls of white craft paper and roll out a 4' length, which was ok, but if you have access to a commercial paper source you can often get samples (I recently got mine through a printing job) of 24point cardboard panels in 28" x 40" size. The board is more rigid and can hang, or stand on an easel, flat near your work.
ReplyDeleteI collect pertinent clippings and photos in separate manila envelopes until ready to create the collage. I use heavy duty wallpaper adhesive (off-loaded from an $11 giant 3.5 gallon tub into small plastic container with a lid.) I now only use a foam brush, as bristle brush metal ferrules would rust when left in the paste pot and get a patina of green mold. I poke the wooden handle of the foam brush through the sealed lid of the container when not in use, thus eliminating the need of washing out the brush every time a girl wants to paste a little. I also recommend keeping a damp wash cloth nearby to wipe away excess paste from the collage while it's still wet.
I don't re-size the images to fit because that would require far too much care and time for this. It must be kept down and dirty styyle, strictly functional. Whatever size I printed out (with ink savings in mind) and however large the magazine image might be is loosely grouped on the panel by point of interest and pasted down as quickly as fingers will fly--we've got building to do!
Your dollhouse hats are spectacular, Ulla. I'll be trying to get as close to them as possible at my scale. Are you still giving classes in them?
FABULOUS! Love the 'quick and dirty' method... Not sure if I have the space to display, unless I put it on the ceiling - now theres an idea! When you get around to doing the 'hats' let me know, and I will give you all my 'secrets'...
ReplyDeleteHi Ulla, May I suggest that you hang a line in yuor work area and hang the reference collages like sheets on the line? I do that here and find it so valuable to be able to refer back and forth where I work.
ReplyDeleteAnd yes'em please, I could use a **HAT TRICK** right about now! Any ideas most welcome!