
Relief by Degrees
HOW TO USE YOUR NEWLY PURCHASED PROTRACTOR:
(suffer along with me, won't you?)
1. Find the center hole on the straight edge of the protractor.
--Check.
2. Place the hole over the vertex, or point, of the angle you wish to measure.
--Huh? You mean the point of the peak where the beams meet?
3. Line up the zero on the straight edge of the protractor with one of the sides of the angle.
--There's no zero on this protractor, but I can imagine where the zero would be if it had one.
4. Find the point where the second side of the angle intersects the curved edge of the protractor
--I'm lost. I don't see how the second beam would intersect but when I follow the instructions I get 45 degrees anyway.
5. Read the number that is written on the protractor at the point of intersection. This is the measure of the angle in degrees.
--Yeah, that's what I'm after apparently.
Today I taped the roof into one piece, labeled the sections and wall positions, and then removed it from the cottage in one piece. I then removed and discarded about half the amount of stand-in beams to minimize the support beam number in the final design. I can imagine this will look very good when the real beams are cut and installed. I'll ask Clare if he'll help me get the measures so we can cut these here beams.
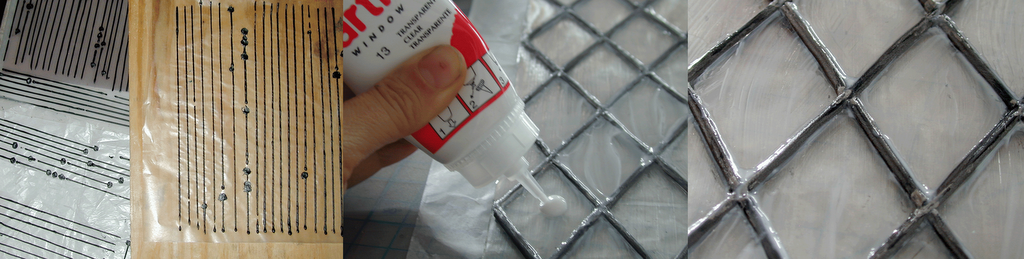
I also managed to pipe a bunch of leading whips. I found that adding a thick transparent "window color" (the kind that can be peeled away when dry) to certain diamonds in the lattice gave a pretty good facsimile of poured glass. I learned from Rik Pierce's method to add more depth of color to the leading by adding flat black and pure silver to the intersections. This improved the effect greatly.
I double leaded the sample panel and have to report it works so well--I'm satisfied with this technique for the cottage. In fact, I love doing it. I plan to do different Tudor patterns on the other window shapes and even to incorporate special glass items to a spot or two with this method. Whew, what a relief.
This window looks great, and I'm excited to see what kinds of patterns you come up with for the others...fantastic technique, I'm sure it'll come in handy someday, thanks!
ReplyDeleteWindows, Widows and armatures galore! This little production marathon is a great idea! We really need to do this more often, and see if'n we can't get a few mor'n involved! Oh, and the window really is looking super groovy! I can't believe you squeezed it out of a bottle! Hey... I'm stumpified on one point Shellopolis....
ReplyDeleteHow come where the whips meet at the lil intersections it isn't all messed up 'n stuff? Do you finish all the passes before the first ones are dry and run wet through wet, or what? 'Splain please?
Thanks Guys, Yay for all the progress! Let's rock it!
ReplyDeleteAnd Mikee, it goes like this, I pipe the liquid/gel paint mixture into straight uniform lines like you see in the photo on the left (the dots were air bubbles). I let those dry completely. I pull them off the wax paper backing and glue long strips across the Tudor pattern in one complete direction, like all the lines leaning left to right. Then I slice and glue the cross pieces to fit the space between those lines, leaning right to left. Then, when the leading strips glue is dry I fill the diamond shaped openings with schmeres of gloss medium and window paint. When that's dry, I hit the intersections with flat black and pure silver paint for greater realism. Taa daa.
Is it time for a video tutorial? That would be good for this.
Wow, I didn't realize you were laying in each in-between piece! Lotsa work, but it pay'd off!
ReplyDeleteAnd yeah, this little marathon rocks...it WILL happen again :)
ReplyDeleteRight on Jeffery! In-tense-sives are kool! Adding the cross pieces was easy peasey by the way, fast and fruitful. This whole technique is quick by my standards. The trick is to place the cross piece and THEN trim away with a flat cut. You guys get that? I gotta do a podcast on this to be sure.
ReplyDeleteOk... got it. It looks great - all the strips looks continuous.
ReplyDeleteyay, thanks.
ReplyDeleteI like your portrait with the protractor - very cool shot, framable, a keeper! I have just one question, scanner or camera?
ReplyDeleteyour tutor tech is nice, really looks good. Its a classic tutor tutorial - ha.
Thanks, Mark! Digital camera and Photoshop.
ReplyDeleteTudor Tutorial! Ha!
'Ciao, pittore!
Y'all most definitately have to do a marathon again! I'm wishing I weren't so occupied with other things right now -- all working really hard at the same time is my idea of a party!
ReplyDeleteHoo hoo! Par-tay! You bet, Sven. It's so great to have drive a production race provides!! Awesome! Join in and/or start the next one when you have the space.
ReplyDelete