
Licorice Whips and Window Making Tips
A little further experimentation proved to be fruitful. I've worked out a technique for manufacturing old metal-look Tudor window leading that is duck soup and may look right.
I haven't seen friend Mark's suggestion yet, nor have I gone looking for master dollhouse craftsman Rik Pierce's method, nor Laika's secret tutorial site (if only) nor to the handy SMA handbook. But I've come up with a technique that I like well enough, and may even love at some point. There are several commercial products available to simulate the look of "pig iron" window leading out there but I chose to work up something that would a. cost less than buying ready made and b. look more hand-made to better match everything else in Halfland. Plus, by mixing my own formula it allowed me to mix the exact color and patina I'd like. I chose a mainly back flat iron but with a muted silver metal finish to it. It just really does look like miniature antique window mullions in person.
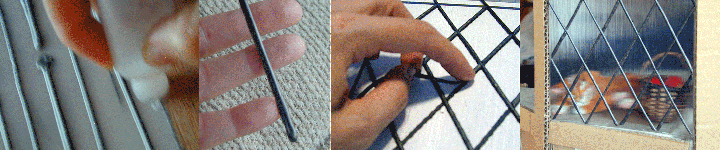
The sample acrylic window panel had been first coated with gloss medium applied with a foam brush and allowed to dry. Above on the left, you see (in reenactment) the right scale squeeze bottle (syringes also worked but were more difficult to control pressure for even flow.) I created lines of the silvery gun metal looking mixture by running the bottle's tip along a straight edge (raised to the correct height for that bottle). I first touched the tip to the surface (flexible plastic or wax paper sheet surfaces, both worked) to start/anchor the line then lifted the bottle tip up and ran it right along the straight edge, letting the line of paint fall onto the surface on its own. After a while, with practice keeping the pressure even, I was able to get the lines fairly straight and uniform. When dry, they lifted easily of the wax paper. Then I used clear paper glue to adhere the dry line lengths following the pattern laid under the panel. I trimmed the licorice like lines with an Exacto™ blade by pressing the blade down to the surface at the desired angle and removing the unwanted portion of line by lifting it away. Adding all the lines to one side took under and hour to complete, and it was a cinch.

Depending on how precise you'd like the look you could match the leading thicknesses up better and trim the joins more tightly. For myself I was merely testing this idea out and needed things to look a bit obviously hand-done anyway. Last shot taken from the inside the cottage, looking out.
Next I'm planning on repeating the treatment to the reverse of the panel to see if it looks more realistic, as the windows will be filmed from both sides. And I'll also be adding more gloss medium in spots to see whether it will make these windows look more like the uneven poured glass I'm after.
I did do a search for Rik Pierce's window technique and scored big. Take a look here at the "homework" day's post for his poured glass leaded window method. Better than mine, I think I'll play around with what I learned from seeing this.
ReplyDeletehttp://www.sylvan.com/~isabella/mini/toyshoppehomework.htm
And for Jeffery, you may want to check out the next post there called; "Bonus" because there's an awfully cool way of making a campfire there! w00t.
The whole site was a treasure trove of techniques for my cottage. (Last time I mentioned his work on my blog I wrote to Mr. Pierce and told him about it. He was most gracious and hopefully he, and whom ever was kind enough to have documented their work in his class, won't mind this mention.)
Wow, that's looking excellent! I'm thinking the thinner the plaxi the better it'll work... too thick and you'll be able to see in between inside and outside layers.
ReplyDeleteThanks Mike, I double leaded on the 1/8" plexi and it sems to be ok.
ReplyDeleteOh my god, that looks so good! Another skill to add to your set!
ReplyDeleteThanks Michael!
ReplyDelete