
Dis-Jointed

It was useful. Not successful but useful.
One really positive result from the test was that I stumbled upon the idea to make the final layer a latex-coated paper skin. It was like papier maché only using latex on the underside instead of adhesive.

FUN to paint in several layers of nice latex into the molds for Kyra the mermaid's arms. After they were dry, I fitted the bandage-wrapped armature inside and back-filled with more latex making for a solid articulate puppet arm when cured. Upper right, the armature curing inside the bound mold halves. Bottom right, the paper skin surface.
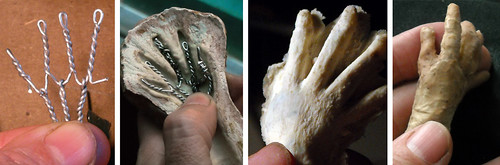
Really just to test the armature, I made a quick wire hand armature. I put small oval pearl beads inside each finger tip but of course the "real" puppet arm will need proper tiny hinges or joints in each finger.
Second from right shows the hand fresh from the mold, the far right is after trimming excess latex away and dipping in thinned latex.
armature test from herself on Vimeo.
Hey, go you for testing out the plastic joint idea!
ReplyDeleteMy expectation was plastic joints wouldn't work -- but seeing it tested is another thing… Exciting.
Do I understand that the plastic rods that extend from the ball joint broke? If so, I'm wondering what the diameter of the plastic rod stubs are… If it might be possible to reinforce them by drilling a hole and putting some brass/steel rod in there.
…And yeah, I'd love to see film footage of how the armature worked out.
(The paper/latex mache concept looks really intriguing, too!)
HI Sven! You are right, the stems on the plastic joints were where they snapped during heavy testing.
ReplyDeleteI coated the stems with epoxy and collared them with a segment of aluminum tubing (that would then fit into a tube length the next size up, like a connector.)
I too thought about ways to make the stems stronger or replace them outright, but in the end I think either replacing them with steel b&S joint that Mani is making for sale soon, or another design, would be more durable overall for the investment.
I really liked the tube idea though. The biggest challenge is going to be that stress point and how to reinforce it.
A teacher of mine once said, it's not the question if your puppet is going to break but when...
ReplyDeleteI like the paperlatexmaché idea... And I'd like to see the armature tested, too!
Good one, Jessica, Hi!
ReplyDeleteyes, I'm trying to build a repair strategy into the puppet design for that inevitability.
Done! updated this post with a demo video and close up photo of the paper test.
The joint's movement looks pretty smooth! Where did you find these?
ReplyDeleteI myself like to work with semi-professional wire armatures, but this looks very impressive!
Oh, and a big HORRAY to the progress!
Yeah, it could be great for puppets with relatively little movement or lightweight puppets that can be treated with gentleness.
ReplyDeleteRevoltech!!
I first saw these types of Japanese model joints used on Mani Zamani's Rose Keeper
Then I googled and found a source in Japanese to sample a variety of styles from a place called Hobby Link. The snap together designs are absolutely ingenious. The only flaw for our use is the point I reference in the top image in this post.
BUT--- Mani says he will be 3D printing these joints in....
STEEL!!! very soon.They may be for sale either through his store in Iran or through Shapeways, et al.
Now that *might* be worth exploring to determine whether the steel can withstand more pressure than the plastic.
I'd be glad to send you a couple joints from my stash to test if you'd like?
Oh, my goodness! Your engineering feats are beyond my limited capabilities but I'm going to have to go back through and understand exactly what you're up to here to learn.
ReplyDeleteJody
I think you're really brave with all this latex! It seems so very complicated and beyond my means and skills anyday! I would have ended up making fabric skin or something had I been making Kyra.
ReplyDeleteHi Jody, I'm not an engineer at all! No way. I've learned a bit from stop motion animation pros here and on educational forums such as http://stopmotionanimation.com/
ReplyDeleteDon't be put off by the boy's club feel over there, they are great people who are thrilled to help anyone learn.
Basically, here's what you need to know, LISTEN TO ME:
There are very fancy and complicated armatures for stop motion. They are more durable for the thousands of bends that are made in a puppet. They can be made for you by skilled engineers, but that's is costly. You an make simple versions out of wire, not as professional looking movement but then perhaps with the charm of your story, that difference won't matter.
As for me, I don't want to pay a pro to make my armatures and I don't want to learn to machine pro-style ones them myself. I want my armatures to be relatively easy to construct and relatively controllable for performance.
A pro armature maker came over several months ago just to instruct and demo for me how they make good wire armatures for tv shows. I will likely go with that method but I had to explore if some other concepts I had were in any way functional.
Bottomline: in stop motion, you need your puppet to hold still. Perfectly still. Perfectly still, even as you move a finger on it or arm, the rest has to remain in place such that it won't shift even a hair's width.
Now, you can avoid a lot of this challenge by shooting your film from above and having your puppets, even paper puppets, laying flat on a tabletop, over glass so you can change props and background layers, etc.
If you like, look into the techniques of pioneer Lotte Reiniger (you will LOVE HER) It might inspire some ideas for you!
HI Ben! I think you'd find it easy overall. It's just a matter of being shown by a friend! Latex itself is nothing but a creamy milk-like stuff that drys out in the air in a couple hours to be like a rubber glove. If you brush it into the inside of a mold, or pour it in and swirl it around and pour out the excess, it makes an exact replica of the mold you made. It's so lovely!
Not necessary to make puppets in this way but great fun.
Other people make their puppets by shaving down upholstery foam and painting it with latex on top as skin. Have you seen Nick Hilligoss' tutorials for that?
Explore them here: http://www.picturetrail.com/sfx/album/view/60051
Cheers!
Wow, Wow, and more Wow! I absolutely love and have total admiration and respect for the way you work through things. It really gets my gears turning... now if only I could have a smidgen of your productivity!
ReplyDeleteHi Peggy! I had to laugh! Productivity? Me!? I feel as slow as a glacier! And me without raising two daughters like you are!
ReplyDeleteI'm looking to perfect an easy armature system like the one I'm showing in the post. No learning curve, nothing hard, easy to get parts, etc.
Hey, you're moving on to the actual puppets - exciting!
ReplyDeleteI think the paper-mache texture will suit Halfland very well. I'm not surprised you would go for the hand-crafted look over attempting a realistic skin - it just seems to fit in with many other parts of Halfland.
A shame the plastic ball stems aren't strong enough - but metal balls with stems on them would be a really useful thing!
Hi Nick! Yep--that's what I need to make this project happen...
ReplyDeleteSteel Balls. -() ()-
I'll see where Mani is with making these. Worse case I can see if one of the new 3D services would make us up some to test.
Shelley, I was hoping to use latex for a snail in my film. I bought some halloween make up latex at a pound shop and painted it on. 1-2 years on it is really horrible and sticky with loads of muck on it! Ugh! I'm just going to make a clay one and glaze it or something. I don't think it has to be as detailed for me anyway. Is latex rubbery like a glove you say? not sure I'd like to animate something feeling like that actually.
ReplyDelete-Ben
I think there must be different types of latex because I've heard of some latex becoming sticky after a while.
ReplyDeleteThere is latex made for puppets, that when used with the right paint on top, remain like a rubber dishwashing glove forever.
If you make a puppet out of clay that becomes hard when dry, you will need to make several, each in a slightly different pose, that you'll switch out frame by frame in order to animate. That's called replacement animation.
If you only want to have one hard clay puppet, you can just scoot it along a little each frame. It may not look as much like a living thing as an armature puppet or a replacement series puppet, but still could be charming fun for a good story!
Latex does deteriorate after a while. So it pays to make your puppets when you are nearly ready to film, and then get on to shooting them within a year if possible. It varies - I've used some 5-year-old puppets, others are either going gooey or dry and cracking after 2 or 3 years. The UV in sunlight damages them more quickly, so I store them in boxes.
ReplyDeleteyep. I knew that about latex, Nick, but I didn't want to throw everything at him at once. Plus the 16 year old casts I've got of Kyra are still flexible and not sticky?! I wonder what brand latex that was?!
ReplyDeleteThanks Shelley, Perhaps if the snail was going through long grass or something there would be no need to show ripples on its belly? Anyway it could still look gooey like the real thing was a glaze, right?
ReplyDeleteThanks Nick, I know some of Harryhausen's puppets went cracked and bits fell off but mine went sticky. I assume it was becuase the latex was so cheap it just diddn't live long enough. I will remember now to store it in a box!
Yes, long grass would cover the snail bottom and save you a lot of trouble. Great thinking, Ben!
ReplyDeleteAnd me too on the Nick tip for puppet storing, thank you, Nick!
woo hooo!! puppet action a hapening....
ReplyDeletevery cool ...and great documentation of your experiments.
jriggity
So exciting to see movement! Love the fabric bandage look - should flex very nicely.
ReplyDeleteI love seeing your experimentation.
ReplyDeleteLots of accumulated knowledge there.
It is all coming together nicely.
Just remember as cool as machined armatures are, it can be quite the rabbit hole to go down. How does Alice get out, i can't seem to remember.
A well made wire armature will serve you well, last a decent amount of time, and with practice give you some great animation.
Your paper/latex skin has a really nice look to it.
Great stuff
Thanks, Emmy and Mark.
ReplyDeleteThanks for the wise wise words, Mark.
Not sure how'll I get out of this hole. But I know I will not go chasing after machining my own armatures! I'll use visible wire joints on paper puppets before I do that.
that tiny hand looks *beautiful.*
ReplyDeleteIt's so exciting to see the puppets coming together! That elastic bandage stuff looks pretty useful... It's also amazing that the Japanese rice paper can be made stretchy with latex!!! Very clever....!